|
| © Mol Smith 2008 |
Mols Animated Props for Poser
4,5,6,7 & Pro
|
V1.0 Rain and Snow
|
|
| |
|
Ensure you are Internet
connected to see video Tutorials.
|
Welcome | Props |
Poses | Textures | How To | Tips | Problems |
Web Tutorials | Make a Bomb Blast | Import Google Sketch-up Models |
Email Mol | |
| |
video examples
|
|
| Please at least read the sections
under Props and then Poses before anything else. |
|
| |
|
|
|
TIP: You could send
this file via a shortcut to your desktop so you can access it easily later when working in poser!
A bigger Tip: How
to create your own figures and props using Google's
Sketch-up Free program and make them Poser-ready!
See Here!
|
| |
|
|
Welcome
Many thanks for purchasing this product. Just a quick plug here: if you like this one, you may wish to check out
my animation tool kit for V4 and my animated expressions - all at renderosity. Thanks. Not certain how familiar
you may be with animating in Poser, so I have included a few tips here for animating in general. Most of my advice
centers around the use of the Graph Window and Animation palette. The better your use and understanding of these,
the easier it will be for you to animate with a degree of ease.
Poser survives because of the people who hack behind its original capability. The poser community is about learning
as you create. My help file here supports this group-learning and cross-inherited talent. Most Poser users understand
this and grow with this hidden knowledge as they create!
Mol
|
About
This set of animated props for Snow and Rain enable proper 3D animation of a few of the weather elements. One could
create a set of props, which perform as 2D objects on a 2D plane, or a set of planes, to give the illusion of depth.
This would be fine for still image rendering but not so good for animation and movie production. With these props,
when you move the camera around or rotate your scene, the props have proper dimension and still work. The downside
is they are not very good for still-image rendering - thus they have been deliberately aimed at the movie-makers
and animators in the community. Also, due to the need to reduce the number of vertices and faces in the figure
geometry, the figures themselves, for example the individual rain drops, will have non smooth and holed surfaces
when viewed in Macro. This will not be an issue when the figures are animated.
|
Props
|
|
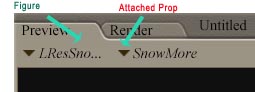
Many thanks for purchasing this product. The props
in the package are all figure props - that is, they are located in the figures menu of
the Poser side bar and behave as posable figures. This means each figure-prop has a body and
an associated prop. When using the figure props, it is best to select the associated prop from the menu rather
than the body element. See below - Fig.1!
| In the display window, you select the figure and
then the associated element. In the case of my animated figure props, you will select the non-body element of any
figure-prop. When you delete a figure-prop, be sure to delete the prop element AND the BODY ELEMENT too! |
 |
| |
Fig. 1
|
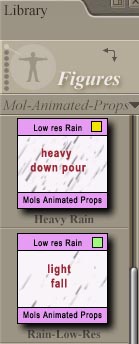
Props and Poses
Each figure-prop has a set of one or more animated poses associated with it. The figure props are in the FIGURE
folder, and the poses are in the POSES folder (as normal). You must be careful to select the figure sub-element
(not its body element) before applying the pose to it. You must also be careful only to apply the correct pose
to the right figure prop! To assist you, all the figure-props and their related poses are colour-coded with a small
colour square in the thumbnail. See Figure 2 below.
In the Side bar, you can see a small colour square
to the right of the upper border in the thumbnail of the figure-prop. Only poses which carry the same colour square
in the Poses thumbnails should be applied to the figure-prop. So, in this example, you can only apply the 'sec
heavy rain' pose or the 'sec heavy rain' to the 'heavy down pour 'figure-prop, as they all share a yellow coded
square . But you cannot apply them to the 'light fall' figure-prop because it is coded blue.
Most of the Poses (not all) are 2 secs long. You can increase the animation quite easily to any length you like
but you need to read about how to do this properly - especially if you do not do a lot of Poser animation - in
the appropriate section below. See How
To!
My figure-props come in Low-Res and
Hi-Res options. Since the props are real objects with meshes and many facets, despite the fact they have been optimised
to keep the vertices count small, you may find your PC is not quick enough to render the animations in a suitable
time, unless you use the low-res figure-props.
My pc is fairly average in power and speed and the hi-res figure-props have performed well on my computer, but
you need to try both the low-res and hi-res figure props to see what's best for you. |
|

|
| Note: You might inadvertently try
mixing color coded poses to inappropriate colour coded figure-props and find some of them actually work. Good luck
to you, but remember it is best to stick with the colour coding process for ease of use. |
Fig. 2
|
Ideally, you should use the low-resolution snow and rain figure props for PREVIEW renders when your final video
is only a quickie and not a full firefly or Poser Full render video. Needless to say, the hi-res props are more suitable for professional full video
rendering.
Poses
Please read the props section before reading this.
After loading any of my figure-props,
you can animate it yourself or start with one of my animated poses and alter it afterwards if you wish.
You should understand a bit about animating, especially with respect to a knowledge of the animation palette and
the Graph window. My poses are started and ended with a break-spline element. This allows you to apply an animated
pose, add one more frame, move to that final frame, and apply the pose again to build up a repeating cycle of rain
or snow fall. Should you not add another frame and move to it before repeating the apply pose, you will interfere
with the previous set of frames and probably halt the animation. Take a look at the How
To section to see exactly how to
build up animation times.
After applying a pose, you may wish to move the swirling snow, the pouring rain, or resize them, depending on your
scene. The quickest way is by using the graph window and moving the points on the x,y,and z trans along the time
line. Just in case you are not familiar with the graph window, here is a very brief head's up on using it.
|
Fig. 3 The Graph Window
[1] - The element you intend to adjust. In this
case the associated prop (not the 'BODY' ) of one of my snow figure props. we are using the window to adjust the
movement in the y-axis - called y-trans here for 'y-translate' [2] , which in most cases is down the screen top
to bottom. The time-line of 60 frames ( at 30 frames per sec) is indicated by the numbers 1 to 59 above the window.
You can use the slide-bar [3] to move along the graph window or pull on the tiny nibs at either end [10] to reduce
the number of frames visible. The diagonal red-line [6] represents the behaviour of the y-transition of my snow.
It is starting high [4] and moving down towards the ground [5]. If we put the cursor over the last little notch
at the end of the red line and left-click - moving the mouse upwards, the red line will follow. This will have
the effect of causing my snow to fall less down the screen at the end of 2 secs than before. You can use the mouse
to move the green line left and right [7] which will also move the frame viewed in the preview window to help you
see what is going on. Two important controls are [8] and [9].
It is best to hilight all the frames - by holding left click mouse at the left-most( frame 1 vertical white line)
and moving the mouse to the right most (frame 60 here) vertical white line, before letting go. After they are hilighted,
click the control [9] to make the animation transition linear. This is almost always the best mode for animating
elements in poser. You can use control [8] to break the continuity of the animation, which is best done at the
start and end of my poses in this set.

|
| |
Scaling up one of my figure-prop's will give
the illusion of the snow or rain being closer to the observer - the front of the screen!
|
| |
|
|
Textures
|
|
|
I struggled with the textures, especially for the
low-res rain. The problem is what angle, what light set, what elements and colours will lay behind my rain in your
poser compositions? So, after many days experimenting, I defined the least confusing, and most optimised textures
for both the low res and hi-res rain - yes, the snow too. But hey... you can always drop into my materials folder
by selecting the materials top tab in Poser, and try some of these alternatives, if my defaults don't look good
for your composition. See below! Or
play with the materials and create new textures... even sell them on Renderosity!
The main thing to remember, and I am repeating this,
I know - is to use the low-res props when you intend to produce a quick video in Preview mode. Use the Hi-res figure
props for pro-videos rendered in firefly or the Poser non-preview render engine.
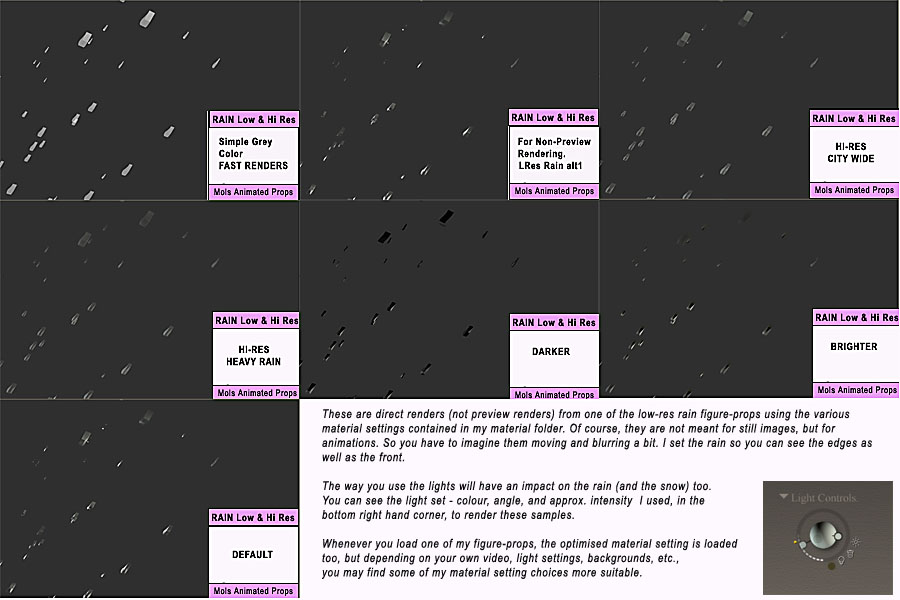
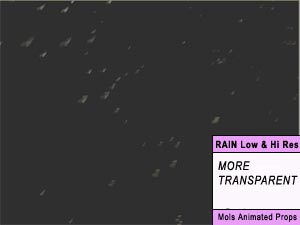
Oops...
One more for low res rain texture to choose from... |
 |
| |
|
| I have not shown the snow textures but a similar set of criteria and results are obtained. |
| |
|
|
How To...
|
|
|
| |
|
|
...use the various rain and snow poses.
The important thing really is the scale. If your video part is a close-up of a figure, say V4, then you need only
use a small scale pose. My poses contain a scale content too! If, however, you are far back and video-rendering
a large scene, a city for example, then a massive or wide scale pose would work better.
...create a Blizzard
I have included one blizzard pose for you. The principle is, load a snow-figure prop, set a key frame, add say
90 frame, go to the end frame and rotate the snow figure prop around its x,y,z axis and set the . This ensure the
snow spins widely between frame 1 and frame 90.
...use the three single snow flakes or
the large single rain drops
These well-defined snowflakes can be added in the foreground and animated using one of my poses or by you animating
them directly. They are intended to be used sparingly to create an effect of snowflakes drifting through the scene
as in close-up with respect to the viewer. The same principle applies for the large rain drops.
...build up a longer animation sequence
animation
Since most of the included poses only animate the figure props for 2 secs (at least 1 exception exists to this)
you will need to understand how to extend your video by repeat-loading poses at every 2 sec interval.
...use bump and displacement
My rain and snow do not use these. So if you render with displacement on or off - it does not matter.
Problems
Can't see rain or snow
after loading figure:
use a darker background.
Rain looks too bright when
viewed from the side or front, especially low-res rain:
adjust lights to different angles,
use materials to load darker material from my mats library.
Rain shower too small
to cover scene:
scale up using the scale control.
Ensure the increased scale is carried through linearly in the pose or apply a mid-scale or wide-scale pose to have
this done for you. |
| |
|
|
Tips
|
|
|
|
TIP1: You could send
this file via a shortcut to your desktop so you can access it easily later when working in poser!
TIP2: To
delete one of my figure-props, select 'BODY' and delete that, otherwise you will have to do two deletes for each
figure-prop!
TIP3: Scale
any of my figure-props bigger to suit your scene and animate the x,y,z trans to create your own animated pose.
TIP4: Apply
several figure-props, and their poses to your scene. Scale them, twist them, mix them to create new weather situations.
TIP5: If you
are creating preview videos, use the low res props as they are fast and create a good rain or snow impression.
TIP6: Create a meteorite shower by scaling up
the hi-res rain and moving your camera close-up to follow the shower.
TIP7: To Animate
a figure-prop manually, apply a pose to set scale, then apply the CLEAR pose.
TIP8: Make a Bomb Blast
Load one of the low-res snow figure props. And 30 frames. Goto frame 1. Reduce the scale of the prop to a minus
figure. Go to frame 60. Scale up the prop to 10000 or bigger. Open the graph window or the animation palette and
ensure the scale timeline is set to linear.
Select the figure-prop (not its body) and go to material and apply a red, yellow, or flame procedural from the
default materials in Poser.
Render the video in firefox. Hey presto- shrapnel! You might need to add a flash, and hey - maybe I will include
that in my next set of animated props!
I haven't spent a lot of time on this to polish it, but the quickie I did to explore the idea with give you a guide
to doing it better.
Google Sketch-UP and making Poser Mesh Objects (Props)
Free and easy. Save hundreds of dollars!
You need the following:-
Download them and follow through the rest below...
Use Google Sketch-up to create your model then export it as a 3D model.
The free version of Sketch-up only allows export as a KMZ file. Choose the option for GoogleEarth 4.0
Use Unzip to extract the files from the .kmz file. This will deliver a .dae file and some texture files into the
unzip folder.
A .dae model is a new cross-standard, cross-platform 3d model file format. Alas, Poser cannot import this, but
hey... good news - MeshLab can.
Open Meshlab and it will ask you to open a model file. Select the .dae file you just extracted, and wham,Zam, thankyou
mam... it loads into Meshlab. You can use Meshlab to adjust some aspects of the model, but the essential thing
is this, Meshlab will export that model as a wavefront object file (.obj) or a 3Dstudio file (.3ds) which you can
import into poser. You may need to play with the textures a bit afterwards but at least you have been able to create
a 3D object for Poser without paying a dime for 3D modelling software.
Great!
mol
|
| |
|
|
|