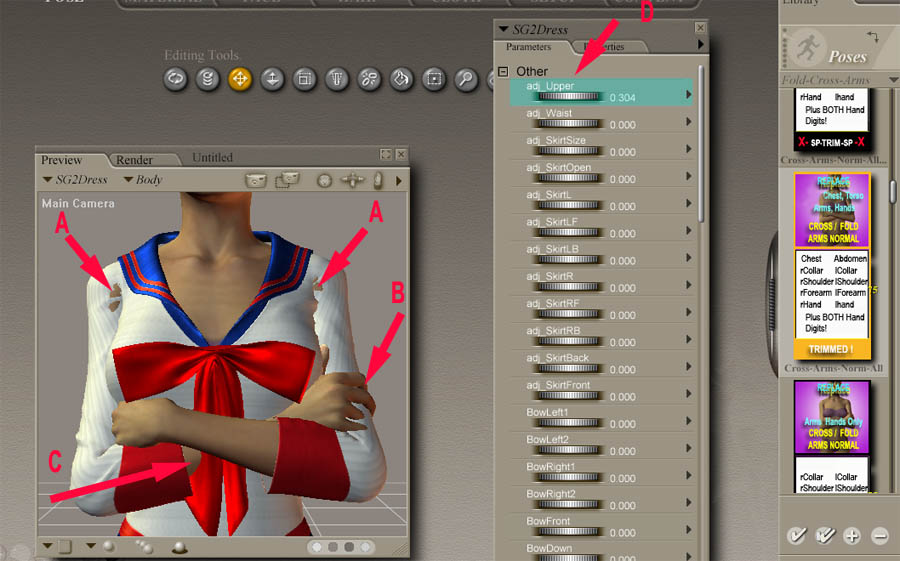
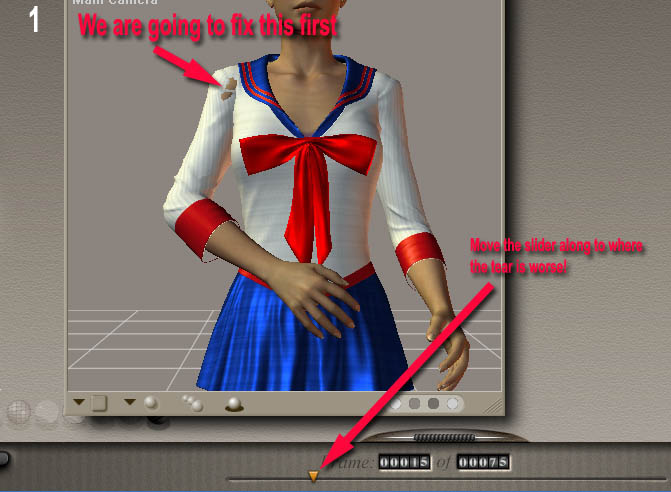
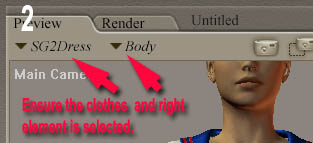
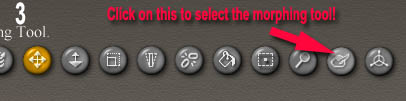
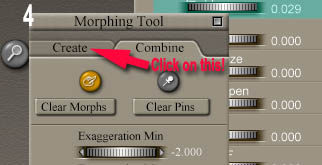
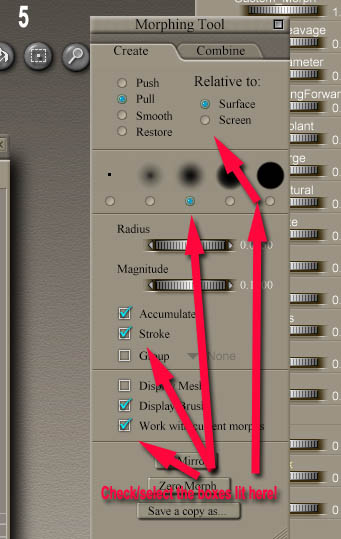
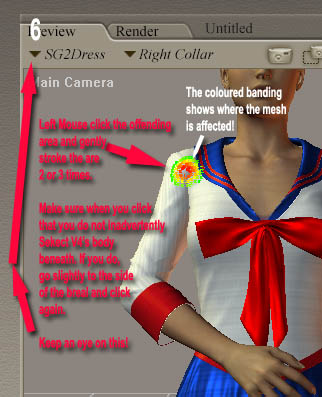
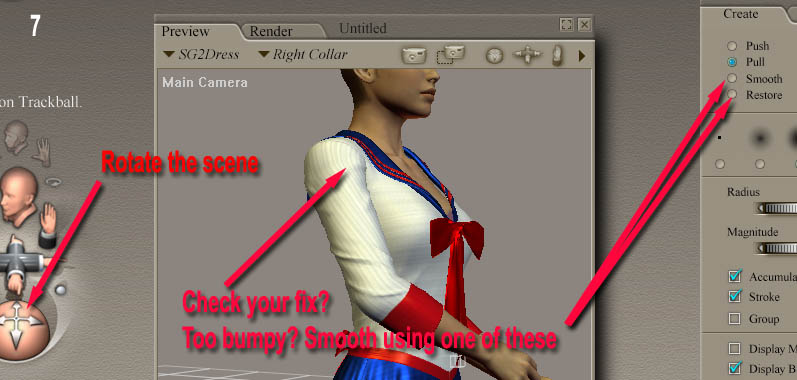
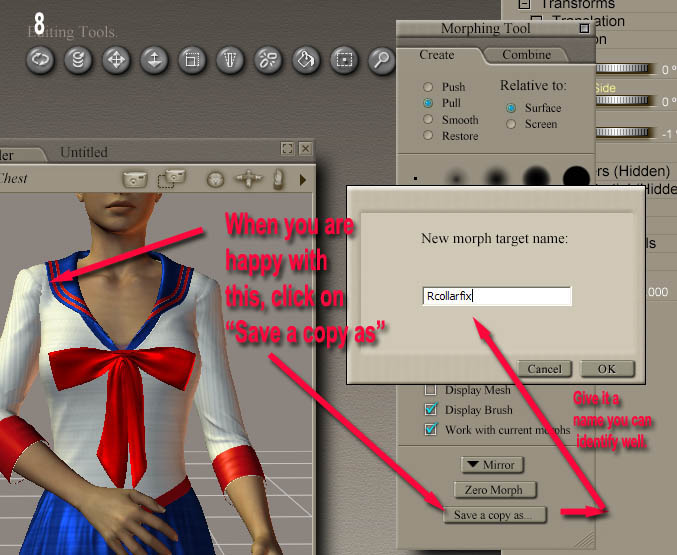
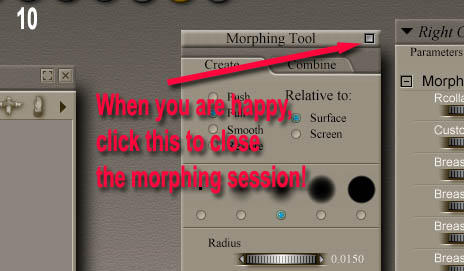
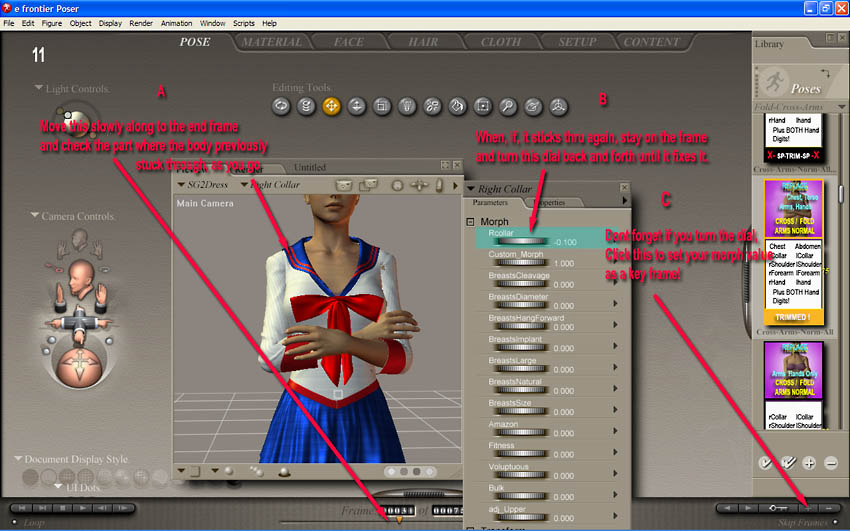
Mol's V4 Animation Toolkit

** Return to Menu-Index **

Animated Poses and V4 clothed
How to fix V4 breaking through conforming clothes!


Dedicated to bringing
Virtual Characters Alive!


IF YOU WANT TO TAKE ADVANTAGE OF VIDEO EXAMPLES / TUTORIALS / MAKE SURE YOU ARE CONNECTED TO THE INTERNET WHILE VIEWING THIS HELP SUITE. CHEERS... mol

If you like this package, Mol's V4 - Come-Alive Expressions is a perfect addition.
Available from Renderosity -
click link above. (You must be connected to the Internet).

If you find errors (easy to fall victim too) and want to point them out to me,
please do. I will look into them and correct any problems. After awhile, I will re-release the modules to all purchasers (update) freely.
Contact me at here please!


Using the Animated Poses with a clothed V4

One of the problems with animating the V4 figure is when she is clothed. Even with conforming clothes (best to use these) moving the figure often results with parts of the body mesh/geometry poking through the surface of the clothes. There are several ways to fix this, but first let me show you and example.
 
In the screenshot on the right, you can see the final frame of my CROSS-ARMS animated pose when applied to V4 wearing the schoolgirl dress. Parts of the underlying body have poked through near the collars and shoulders {A}. Her right hand fingers, which would sit perfectly well on her naked arm {B}, now poke into the clothes, and her right arm intersects unconvincingly with the dress bow {C}.
 
The first thing to do is to try the various morphs provided by the Clothes Figure Creator {D} to see if varying these values along the animation sequence can clear the problem. Sometimes you can clear issues this way. The fingers poking through the clothes are quite easy to adjust manually in the Graph Window, but when you can't use the clothes adjusting morphs to fix the problem, what do you do?

The answer is to create your own mini-morphs to fix the holes. It is not as hard or time-consuming as you at first think. Anyway, I am going to show you how to do that simply here.

Follow the Images below as they explain more readily than anything I can write here!


Rotate the scene around to check you have not overdone
the morph. Checking it from the side will show you if you have fixed one problem but created another one in the guise of a great unreal swell of cloths. If you have, you can click on RESTORE or SMOOTH in the Morph Palette Window and stroke the area again once to flatten it back down.


I'm running out of space now so hopefully you understand how to use morphs to fix breaks. That Red Bow can be pushed back with a morph, where the morph just starts to press in as the folded arm comes into contact with it. I have created a video tutorial of the whole thing, alas without sound, but shows me fixing the other shoulder/collar break-through, the bow, and the fingers, in that order.
 
Take a look and you will see how easy it is to do. You will notice me moving the frame number pointer back and forward a few times, or moving the marker along the graph window as I check to make sure the fixes work. Remember to turn off "skip frames" when doing this! I never quite fixed the bow 100% in the following video because I was aware of the length of the video growing. So I worked quick and dirty but after the video-recording stopped, I spent another five minutes gently smoothing the morphs and watching the key frames to adjust the fix in a more refined way. You can see the result here! TIP: You know when you try and cross V4's legs or arms, part of the leg seems to cut into the other one (or arm), you can create a mini-morph to press the skin of the body geometry in just as one limb presses onto the other. Great if you like to make your animations look very real!

THE TUTORIAL VIDEO IS HERE!


 ** Return to Menu-Index **


Copyright: Mol Smith 2008 UK
www.onview.net        www.molsmith.net     www.v4-ultrareal.net